Tired of spending a fortune on gift bags that are either too small, flimsy, or just plain boring?
The solution is simpler than you think: learn how to make a gift bag out of wrapping paper!
With just a sheet of paper, some tape, and a few folds, you can create a custom DIY gift bag wrapping that fits any gift perfectly, even oddly shaped items.
To start, fold the paper around the gift, tape the side seam, and crease the bottom into triangular flaps.
Fold and tape the flaps flat to form a sturdy base, then finish by folding the top edge and adding handles or a ribbon for a polished, professional look.
In the article, you’ll discover step-by-step instructions, materials tips, folding tricks, creative handle ideas, variations for different gift sizes, and troubleshooting common mistakes.
Therefore, let’s dive in!
What You’ll Need to Make a DIY Wrapping Paper Gift Bag
Below are the essentials you’ll want before you begin.
- Wrapping Paper
- Scissors
- Tape (or Adhesive)
- Ribbon or Handles
- Flat Work Surface
Recommended Paper Types
Here are the top paper options depending on your goal.
1. Standard Printed Gift Wrap: Bright, colorful paper that’s affordable and widely available. Great for lighter gifts and festive occasions.
2. Kraft Paper: This unbleached, brown paper stands out for strength and sustainability. It’s recyclable, compostable, and perfect for rustic or minimalist designs.
3. Textured Paper: These tend to fold crisply and hold their shape better in a bag form.
4. Patterned Papers: If you want your bag to stand out, paper with bold prints, seasonal themes, or elegant designs can do the trick.
Step‑by‑Step: How to Make a Gift Bag Out of Wrapping Paper?
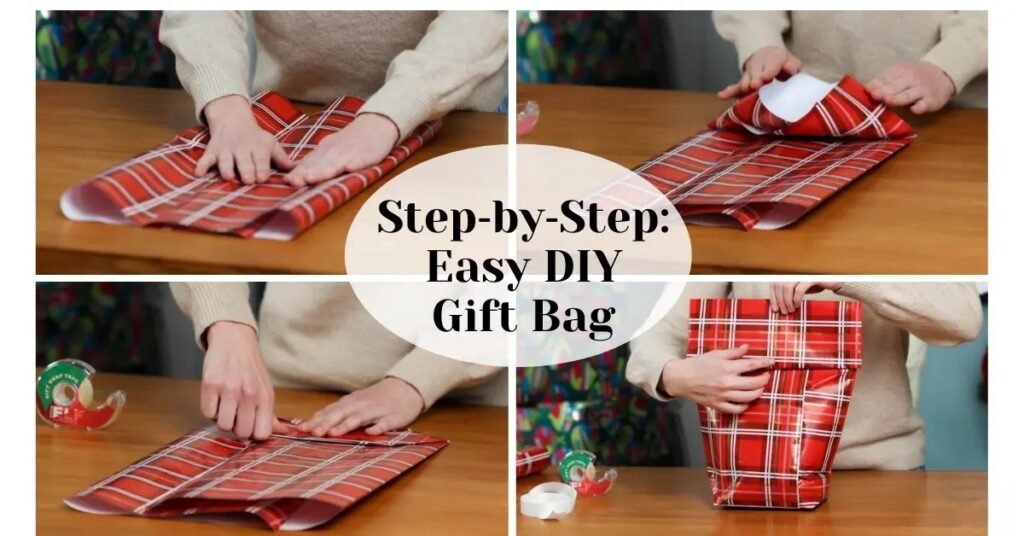
Follow each step to make your gift bag out of wrapping paper securely.
Step 1: Measure and Cut the Wrapping Paper
Start by placing your gift face-up on a flat surface with the decorative side of the wrapping paper facing down.
Extend the paper around the gift so it completely covers the width, leaving an extra 2 – 3 inches (5 – 7 cm) for the side seam.
Measure the height so it fully covers the gift from bottom to top, adding 3 – 4 inches (8 – 10 cm) at the top for the folded edge.
Using sharp scissors and a ruler, cut a neat rectangle.
For oddly shaped gifts, it’s better to cut slightly larger than necessary.
Step 2: Fold the Sides and Seal the Seam
Fold the left side of the paper toward the center, then fold the right side over it so that the edges slightly overlap.
Crease the folds firmly from top to bottom, creating a clean edge that will form the body of your bag.
Secure the seam using double-sided tape for a polished finish, or use craft glue if you prefer.
At this point, your paper forms a tube with two open ends; one end will become the base of the bag, and the other remains open to insert your gift.
Ensuring a tight, neat seam is essential for the bag’s stability and appearance.
Step 3: Create a Strong Base
Fold the bottom edge of the paper up about 2 – 3 inches (5 – 7 cm) to start forming the base.
Open this folded section to reveal a diamond shape. Flatten the triangular sides by folding the left and right corners toward the center, and lock the diamond into place.
Then fold the top and bottom of the diamond slightly overlapping toward the center and secure with tape.
For heavier gifts, add a small piece of cardboard inside to reinforce the base. The finished bottom should sit flat and sturdy.
Pro Tips for Beginners
For crisp, clean folds, press each crease firmly with your fingernail or a ruler.
If your paper is thin, double-sided tape helps prevent wrinkles and strengthens seams.
Always test-fit your gift before sealing the base completely, as slight adjustments may be needed for oddly shaped items.
Optional Add-Ons & Finishing Touches
These optional add-ons don’t require advanced crafting skills, but they make a noticeable difference in both appearance and durability.
1. Ribbon or Twine
To add handles, start by deciding how high you want them to sit—generally, about 1 to 1.5 inches below the folded top edge works best for balance and comfort.
Using a hole punch, carefully punch two holes on each side of the bag.
Thread a length of ribbon, twine, or cord through each pair of holes, then tie secure knots on the inside of the bag to hold them in place.
Satin or grosgrain ribbon creates a classic, elegant look, while jute twine or cotton cord adds a more rustic, handmade feel.
For extra strength, place a small piece of clear tape or a paper reinforcement sticker over the holes on the inside of the bag before threading the ribbon.
2. Bag for Heavy Gifts
If your gift has some weight, such as books, candles, or boxed items, supporting the bag is a smart final step.
The easiest method is to cut a piece of cardboard slightly smaller than the base of the bag and place it flat inside.
This hidden insert distributes weight evenly and helps the bag stand upright.
You can also reinforce the bottom seams by adding an extra strip of tape along each folded edge underneath the bag.
For added security, run tape vertically up the inside corners where the base meets the sides.
Variations for Special Gift-Wrapping Needs
This section walks you through practical variations so your handmade gift bag looks intentional, balanced, and secure.
How to Make a Gift Bag for Oddly Shaped Items
Oddly shaped gift wrapping, such as bottles, stuffed toys, mugs, or décor pieces, benefits from flexibility rather than tight folds.
Start by choosing a wider sheet of wrapping paper than you think you’ll need; extra width allows the bag to form natural side gussets without stressing the seams.
When folding the sides inward, don’t force symmetry; adjust each side based on the gift’s shape so the bag sits upright and evenly balanced.
For tall or narrow items, deepen the bottom folds slightly to create a sturdier base that prevents tipping.
Mini vs. Large Wrapping Paper Gift Bags
Mini gift bags, ideal for jewelry, gift cards, or party favors, work best with thicker wrapping paper or doubled layers to prevent collapsing.
Precision matters here: crisp folds and minimal tape keep the bag looking neat rather than bulky.
Large gift bags, on the other hand, need extra structural support.
Wider side folds help distribute weight, while a reinforced base, using cardboard or layered paper, is essential for stability.
Large bags should also be paired with strong tape and reinforced handles, especially if the gift is heavy.
Common Problems When Making a Gift Bag Out of Wrapping Paper
This section addresses the most common mistakes people encounter and shows you exactly how to correct them.
1. Wrapping Paper Tearing
Tearing usually happens when the wrapping paper is too thin or when sharp creases are forced too quickly.
To prevent this, work on a flat surface and fold slowly, using the side of your hand or a ruler to guide the crease rather than pressing with your fingertips.
2. Weak or Flimsy Edges
Weak edges are a common issue, especially when the bag is holding heavier gifts.
The simplest fix is to double-fold the top edge before taping it down.
This creates a thicker rim that adds structure and prevents the bag from collapsing inward.
For added strength, you can place a narrow cardboard strip or folded scrap paper inside the top edge before sealing it.
3. Uneven or Lopsided Bag Shape
If the bag looks lopsided, gently open it flat again and realign the side folds so they mirror each other.
Making sure the base folds form a clean diamond shape before taping is critical for balance.
4. Bottom of the Bag Won’t Stand Upright
Open the base, widen the triangular flaps slightly, and tape them down securely so the bottom lies completely flat.
For heavier gifts, adding a small cardboard insert cut to size at the base instantly improves stability.
FAQs
1. Can I use any type of wrapping paper for a DIY gift bag?
No, you can’t use any type of wrapping paper for a DIY gift bag. Thick or textured wrapping paper works best for DIY gift bags because it holds shape and resists tearing. Thin or flimsy paper can still be used, but it may require reinforcement with tape or a cardboard base to ensure the bag stays sturdy.
2. How do I make a gift bag for an oddly shaped item?
Oddly shaped gifts, such as bottles, plush toys, or mugs, require a little extra flexibility. Start with a wider sheet of wrapping paper and allow extra space on the sides. Create natural gussets by folding the sides inward without forcing symmetry, and adjust the base folds to support the item.
3. How can I reinforce a bag for heavy gifts?
Place a cardboard insert inside the base to distribute weight evenly. Add extra tape along the bottom seams and fold edges for strength. Double-folding the top edge also adds rigidity.
4. How do I add handles to my DIY gift bag?
Punch two evenly spaced holes on each side near the top of the bag. Thread ribbon, twine, or cord through the holes and tie secure knots on the inside. For extra strength, reinforce the holes with a small piece of tape or a sticker.
5. Can I customize the bag for holidays, birthdays, or weddings?
Yes, you can customize the bag for holidays, birthdays, or weddings. For holidays, choose seasonal colors and motifs like snowflakes, pumpkins, or floral patterns. For birthdays, pick bright, playful designs for kids or elegant, minimalist paper for adults. For weddings, neutral or pastel colors, soft ribbons, and subtle patterns create a refined look.
Conclusion
Learning how to make a gift bag out of wrapping paper is a simple yet powerful way to elevate your gift-giving.
From measuring and folding to reinforcing the base and adding handles, each step ensures your bag is both beautiful and functional.
Adding themed decorations, ribbon handles, or even eco-friendly touches makes each bag unique and perfectly suited to the occasion.
Now that you know the steps, tips, and variations, it’s time to put your skills into practice.
By following this guide, you’re creating a memorable experience that shows care, attention, and creativity.
Gift Me What – Where Every Gift Finds Its Perfect Match!